
 How to set up a green screen background studio at home- a simple guide that cost under €200
What is a green screen? And why do I want one?
Green screens are an amazing tool for video and photo editing to a professional level. They can be used to green screen (delete) green parts of images/videos and replace them with digital effects such as animated backgrounds, different locations, 2d animations, etc. Some may think green screening must be complicated or expensive but actually, it doesn’t need to be! If you already have a static tripod and camera like the ones below then all you really need is green cloth, a green backdrop stand, and green backdrop paper. That’s it!
If not there are many cheap options on eBay; search for “photography green screen backdrop”
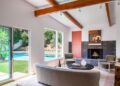
Step 1: Camera and green screen set up
Set your tripod to the height of the green screen (around waist height) then place your green background paper or green cloth behind it. This will act as a solid background for your green screen effect videos/photos later. If you are using a green backdrop stand (recommended) instead, ensure that the green backdrop paper/cloth is stretched tight between both bars of the green backdrop stand. Make sure there are no creases in this green cloth so that none can show on your digital images later.
Step 2: White Balance
Most modern cameras have an auto white balance feature that adjusts all photos are taken under different lighting to have a neutral color tone, therefore, eliminating the so-called “colors not being true” effect. If you are unsure whether your green screen photos will appear green or blue/purplish you can manually set the white balance to green to be safe. Note- if the green color becomes green/brown after taking photos, this means that your green screen was set up incorrectly and probably has a crease in it somewhere.
Step 3: Shooting a green screen photo/video
You can either use a digital camera or a smartphone for green screening images but I assume most people will be using either DSLR cameras with video capability or simply a tripod attached DSLR camera as they are cheap now and very versatile. In my case, I am using Nikon D3100 which I bought from eBay new at €300 and it had a green screen video capability built-in. You can shoot green screen videos or photos but green screen photos must be shot in “RAW image” mode to work best. This is only supported on more advanced DSLRs such as D5100, D7000, D3200, etc. For green screening, I advise shooting at 30fps for the highest possible resolution output later on (if you want to green screen it onto another video or if you’re green screen will not cover the full field of view)
Step 4: Post-production- Green screen removal
The green part of an image/video is what will be replaced with digital images in a photo/video editing program like Adobe Photoshop, Premiere Pro, etc. They are very simple programs and green screen removal is easy once you know how.
For green screen photos:
Open the green screen photo in Adobe Photoshop and go to Image > Adjustments > Hue and Saturation.
You want to reduce the green channel (the second green slider) to 0 and make sure all other colors are unchanged (should have no green). The more green is reduced, the easier it will be for your PS program later to see the edges of background objects which are being kept so try about -10-20% green reduction first. If this does not work perfectly even after you play around with green sliders adjust saturation so there is no green color at all just grey or black pixels then copy/paste that grey/black area into a new file on top of the green area (with the green background still visible) and use select/inverse to cut the green area away. Save green screen photo with a new name for easy step 6 below.
For green screen videos:
Open green screen video in Adobe Premiere Pro, After Effects, etc.
Drag green screen clip into a timeline where it will be placed on top of original footage that you want to keep then right-click green screen clip in the timeline and select “Link to files” then go find where your green background photo was saved earlier and load the green only image file onto green screen clip layer in the timeline. It should appear as a big thumbnail at the bottom right part of the project window when correctly linked so close other windows if necessary. Make sure all other layers are behind or underneath this green screen layer then adjust the green priority slider on the green screen layer to 50% or less (less is better). If the green screen does not work perfectly the first time, go back and mark/link the green screen clip again with the green background photo file by right-clicking the green screen clip in the timeline window and selecting “Link to files” again. Save the green screen project for easy step 6 below.
Step 5: Syncing video with green background
If you are adding green-screened images onto an existing video use open green footage in Adobe Premiere Pro or After Effects etc. Drag green footage onto the timeline where it will be placed underneath the original video that you want to keep then use the “Link to files” feature as with photos above so green footage can display your linked green only background image to work with. Select green footage clip in the timeline then go find green background photo file, load it onto green screen clip layer in timeline again. Adjust green priority to 50% or less as before if the green screen does not work the perfect first time, close other project windows/tabs if necessary, and mark green footage clip again to link green background photo file by right-clicking green footage clip in timeline window, select “Link to files”. Now that everything is linked properly you can adjust the green screen set-up further by adjusting the color of the green screen video until it matches the background image better.
Conclusion:
If the green screen is set perfectly green background will disappear into the green footage clip (see pink arrow green screen layer below green/pink area of the photo, green screen disappeared). Green screen footage should be green only where the green screen was placed. If you are not using Photoshop to remove the green color from your green screens make sure the green priority slider on the green footage clip in the timeline is at 50% or less (less is better) so costumes or other objects can appear behind the green screen instead of on top of it.


