
Today, you don’t need to get out of the house to watch recordings on the big screen. If you have a video projector, home theater, or TV and DVD player, you can copy any of your films to DVD and organize to watch it at home whenever! Additionally, lots of people keep their family video documents simply on various types of media to let loose memory on the PC. Undoubtedly, we don’t frequently re-watch these files, and they occupy a ton of room on the hard drive.
There are numerous projects planned exclusively for consumers. In any case, specific items are not generally advantageous because disk burning is typically joined by other video handling assignments. For instance, you may have to alter the video before watching it or improve its quality. Now and again, you likewise need to revise VHS tapes to DVD or save recordings from the Internet. Presently there’s no compelling reason to search for separate projects for every one of these errands since all you require is in one general program bundle – Movavi Video Suite.
In this how-to-guide, you’ll figure out how to rapidly and effectively burn videos to DVD with Movavi Video Suite.
Stage 1: Download and install Movavi Video Suite
Download the installation file to your PC. Run the file and adhere to the guidelines on the screen.
Stage 2: Open the disk burning utility

When the installation is completed, launch Movavi Video Suite. Next, go to the “Data” tab, select “Burn Disk,” and press “Launch.”
Stage 3: Add videos to the program

Go to the Video tab, click the “Add Documents” button in the lower-left corner of the program window. In the window that opens, select the video file that you want to record and click the “Add Records” button. After you have added all the required entries, click “Close” to return to the program interface.
If you need to add all entries from one folder, use the “Add Folder Contents” button. Video files can also be moved to the program directly from the Explorer window.
You can add accounts in any well-known video formats: WMV, MKV, MOV, AVI, MP4, FLV, and others.
Stage 4: Enter the name and select a drive type
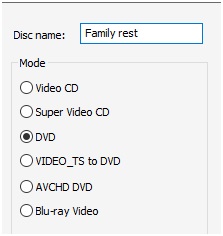
You can copy the video to DVD, CD, or Blu-ray. There are two alternatives for CDs: Video CD and Super Video CD. The Super Video CD standard produces greater video than the Video CD, however, the SVCD will hold less video than the VCD.
There are three alternatives for DVDs: DVD, DVD from VIDEO_TS, and AVCHD DVD. AVCHD DVD is a more advanced norm than DVD; this allows you to record more videos. However, not all standard DVD drives will read AVCHD DVDs.
The DVD from the VIDEO_TS choice is for copying a video to a disk from the VIDEO_TS organizer. This capacity is helpful on the off chance that you have recently saved a DVD video file circle on your PC and now need to modify its substance to DVD. You can also use this selection to dub videos, starting with one round of DVD videos and then the next.
We will show you how to rip a video using a DVD model. To make a DVD video, you need to check the DVD box in the Mode segment.
Stage 5: Specify the settings
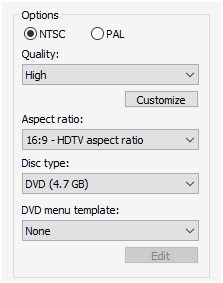
Under all options, you can determine DVD settings. First, you need to choose the norm – NTSC or PAL. The standard solution depends on the topographic area in which you intend to use the circle.
Then, you need to choose the quality: Low, Medium, High, or User Settings. To change the quality physically, click the “Customize” button and set the ideal piece-rate utilizing the sliders. The higher the bitrate, the higher the nature of the video, yet the more space it takes up on the plate.
From the Aspect Ratio list, select either 4:3 (standard video) or 16:9 (widescreen video) for the viewpoint proportion of the video. On the off chance that you intend to watch the DVD on a gadget with a widescreen, for example, a Full HD (1920×1080) TV, select 16:9.
In the Disk type list, select whether you need to compose the video to a solitary layer disk (4.7 GB) or a twofold layer disk (8.5 GB).
If you need to create a menu, select one of the formats from the list of DVD menu templates. To see what their chosen format looks like, click “Customize”.
Stage 6: Start recording the circle
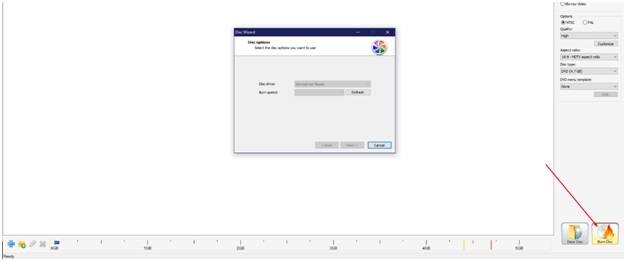
All-important settings have already been set, and you can begin recording. Supplement the DVD into the drive and snap the Burn dvd Disk button. If you have several drives, select the necessary one from the Disk drive list in the window that will open. Click the Next button and pause while the DVD is being created.
With Movavi Video Suite, you can, without much of a stretch, duplicate video to DVD from your scratchpad or PC, and that is only one of the numerous highlights of the Movavi Video Suite. The toolkit likewise incorporates a full-included video editor, screen recording utility, VHS and TV tuner capture, a video converter, and other useful functions.


